Slowing down the Christmas Crazy

The last few months have been crazy. I once had a small non-stressful contract with a digital publisher that never pushed too hard for crazy revision or overnight edits, and self-published on a somewhat ridiculous schedule… but then I signed with an agent. And while that has been a relief in some ways, it brings a completely different kind of stress. Now I feel like it’s been FOREVER since I’ve had a release, but I’m working twice as hard behind the scenes.

And things are not getting done.

And my kids are growing up so fast.

And a lot of days I wonder if maybe I’m being selfish, trying to get this dream launched when I should be present. And available. And not stressed out because I’m trying to do ALL the things.

But I think I’m too selfish to wait. It took me almost 40 years to get the guts to follow my dreams (I think about 35 of those were spent figuring out what my dreams actually were! Okay, maybe five of them were spent just having fun and running around NYC with my girlfriends…)

Right now I have a book to revise. And there’s a part of me that wants to run around with my hair on fire and get it done right effing now. Because that’s kind of how I am about everything. But the problem with that is that I have so many other PLANS. I want to finish the guest room before Christmas. I want to redecorate the front room… I want to make curtains for the front room. I want to continue nagging the hubs to hang our new dining table light and to set up the home gym in the basement. (Because it turns out I’m supposed to like, exercise, sometimes.)

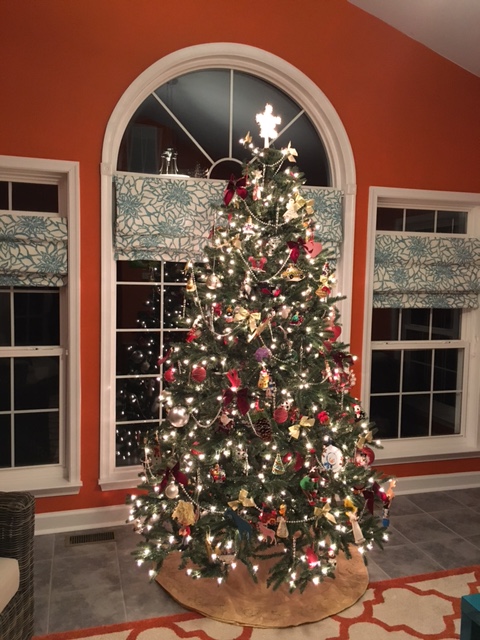
But for a little while, I’m trying to just BE. To be a mom. To be a person who loves the holidays. To be a grateful wife who knows that these days will not last. More crazy and crisis will come our way. Christmas is only a short time — a month, really, if I get the tree up soon after Thanksgiving. And I know it’s just shiny lights and jingly bells, and that isn’t what the season is about.

But you know what? Those fleeting shiny decorations are representative of so much more to me. They are joy and light, innocence and peace. The sheer mad helpless excitement that my children feel during this month is priceless — and like the season, it is fleeting. I know that they won’t be eight and six forever. Cynicism will set in (after all, they are my kids). And soon the magic will fade. Reindeer won’t fly anymore, Santa will be just a guy in a cheap velour track suit with an unconvincing beard. No one will be wildly excited about a candy cane or beg to help me set up my little village. The glitter will be just shiny dust, and while they’ll always love the tree (because they are my kids), they’ll turn to being excited about different things. Material things.

And so I’m going to pause in my frantic efforts on the publishing treadmill. I’m going to get the book back to my agent in a timely fashion… but before I do, I’m going to hold my children on my lap and read the holiday books they bring home from school. I’m going to light a fire, pour hot chocolate and talk to them about their stockings, muse about where the elf might pop up next, and plan what little treats to stick behind tomorrow’s door on our advent tree. I’m going to take this month and live with my beautiful family, basking in the knowledge that what we have now is good. Is magic.

And this tree–my shiny glowing Christmas tree–makes me think of all of that. I’m sharing it with you in hopes that you will remember to slow down and reflect a little bit this month, too. IMG_1726

Advertisement

Fireplace Makeover

There are LOTS of projects in our house that demand attention (pink master bath countertops, anyone??) But since we lack the cash needed to undertake a major makeover at this point, we’ve been focusing on small, high-impact projects. I have a dining room update coming that I’m totally excited to share… but for now, I present: The living room fireplace…

Here’s the before:

brick fireplace makeover

Yeah. It wasn’t super exciting. I like exposed brick — especially if we’re talking urban apartment. But in a suburban house built in the last 20 years, I feel like it’s just one more standard-builder feature. And I wanted to make ours a little bit different.

So I pulled off the mantel and gave it a few coats of paint. I actually did it in two steps, and the first one was definitely the most labor intensive. I used 2 pints of paint — actually less, since when I pulled something out of the back of my car, one of the pints opened up on the driveway. That was not my smoothest move. I fashioned a scoop out of tin foil and literally scooped it back into the can, getting paint pretty much everywhere. I saved as much as I could, and then hosed off the driveway for a good half hour. (*we do not live in California anymore. This would have a been a much tougher proposition if I was super wary about water usage!!) I scrubbed and hosed, and the spot came out…

But that’s not important right now. Back to the fireplace!

So I painted one coat of a nice beige neutral…not super exciting (see photo…)

first coat fireplace

This coat took the longest because the brick is so porous and it soaked up a ton of paint. Next, I sponged on a lighter color sparsely.

2015-07-11 21.38.46

The lighter coat really brought out all the dips and crevices in the brick.

After that, I put the mantel back up and called it done! A one-evening project with a ton of impact!

2015-07-11 22.09.05

Goodnight Garden

We live in a kind of rural place… not like the middle of nowhere. Like an hour from nowhere. (And about an hour from DC, so it’s all good…) But we have enough space that the hubs bought a ride-on mower and for the first year I got to plant a real garden. My tomatoes and squash were seriously out of control, and while my neighbors might have initially thought I was crazy when I dug up and then fenced a ten foot square pretty much in the middle of our yard, they understood when I showed up with baskets of tomatoes!

garden

But now, it’s getting cold, and it was time to pull out the rest of the plants and settle the garden for the winter.

So I ordered a truckload of mulch, and a big truck dumped a serious mountain of it into our driveway. And for two solid weekends, I drove our little tractor around and shoveled mulch and made tree rings and stuff. I’m like an effing farmer! (Okay, not at all. But I did like driving the tractor!)

IMG_1621

So I cleared out my garden, laid cardboard down over the dirt and then shoveled about four inches of mulch over the top of it. The hubs asked me what was up with the cardboard and I didn’t really have a good answer. I thought I read somewhere that I was supposed to do that. Don’t suppose it can hurt either way, right?

IMG_1623

Now all our beds are mulched, my bulbs are all planted, and I even added a little tree ring out front around the cherry tree!

IMG_1622

Guest Room Step 1…

I’ve hated our guest room for a while. We’re still using curtains that were here when we bought the house… and the walls are just blah… and it just doesn’t have much personality. It’s a nice little square room with lots of light, and a big closet. And right now it doesn’t scream “welcome!” But I want it to. I’ve been thinking about what to do in there for a long time.

And I’m still not sure. But I’m thinking about navy blue with pink and yellow accents. And gray. Is that too much?

In the meantime, I saw this headboard at Joss and Main and couldn’t help myself… it’s pretty neutral. Gray, though… It arrived last week and I was super excited. And way too busy to put it together. (Why did the fact that assembly was required surprise me?)

So recently, after some pumpkin farm shenanigans, I set to work. Lunchbox helped by manning the allen wrench. And the assembly was a piece of cake!

And then we went to put it on the bed. It attaches to the metal bedframe with two screws on each side. The holes are pre-drilled through the upholstery of the headboard, and so naturally I assumed there would be no problem attaching it properly to the bedframe. And our frame did have two screw hole slats in exactly the right place! Huzzah, I thought (prematurely, of course.) The screws were too wide to fit through the narrow metal hole. I tried. And tried some more… and realized that there must be a tool in the Major’s well-stocked garage that would certainly enlarge a metal hole. Some kind of drill, I thought. Some kind of file slash drill bit thing, right?

If only the Major had been home… I wouldn’t have had to send him a text with this photo…

destroyed bit

Whatever this sharp saw bit thingy is for, I can tell you…it’s not for enlarging holes in metal. It did work, however, on the one hole I ruined it in. 🙂 So that was a small win. I’d replace this for the Major but I seriously don’t even know what it’s called. I guess I can take it to Lowe’s with my hangdog look and ask them for another whatever it is.

Since the Major still wasn’t home, and I can’t stand leaving things not done, I decided that shoving the bed up against the headboard would work for now. So here is the not-really-yet begun guestroom. (or at least here is the bed!)

IMG_1618

More to come…

Duct Tape Redux

Have you SEEN these??? Duct tape in awesome colors and patterns. If you hang out at Target like I do, you definitely have. And if you’re like me, you’ve been like, what can I do with this??

I have an answer.

HERE is my favorite version of this tape: duct tape

You may recall that I have a teal home office… what you probably didn’t know was that I had a super beat up old white LACK Ikea table (but really, who doesn’t have one of these??) lack-side-table-white__22519_PE107398_S4

And now, I have one of THESE: IKEA Lack Table with Duct Tape Hack!